The Best Fluffy Pancakes recipe you will fall in love with. Full of tips and tricks to help you make the best pancakes.
How to Adjust Seiko Watch Band
Adjusting a Seiko watch band might seem like a daunting task, but it’s a valuable skill that can save you a trip to the jeweler and give you a sense of accomplishment. This comprehensive guide will walk you through the entire process. You’ll learn how to identify the type of Seiko band you have, the tools you’ll need, and step-by-step instructions for adjusting different types of bands. By the end of this guide, you’ll be well-equipped to ensure your Seiko watch fits perfectly and comfortably.
Tools Needed for Adjusting a Seiko Watch Band
Before we begin, it’s essential to gather all the necessary tools for the job. Investing in the right equipment will make the process smoother and more efficient.
Basic Tools Required
- Pin Pusher Tool: Essential for removing pins from metal watch bands.
- Spring Bar Tool: Useful for adjusting both metal and leather bands.
- Small Hammer: Helps in gently tapping out pins.
- Watch Holder: Keeps your watch steady while you work.
- Tweezers and Pliers: For handling small components.
- Microfiber Cloth: To prevent scratches and keep your watch clean.
Optional Tools
- Magnifying Glass: Helps in seeing small parts clearly.
- Link Removal Tool: Simplifies the process of removing links from metal bands.
- Lubricant: For easing stiff pins or links.
Having these tools ready will ensure you’re well-prepared for any adjustment task, making the process efficient and straightforward.
Step-by-Step Guide to Adjusting Your Seiko Watch Band
Now that you have your tools, let’s move on to the actual adjustment process. This guide will cover various types of Seiko watch bands, ensuring you know how to handle each one.
Identifying the Type of Seiko Band
Seiko watches come with different types of bands, each requiring a unique approach. Identifying your band type is the first step towards a successful adjustment.
Metal Bands
These are sturdy and durable, often featuring links that can be removed to achieve the perfect fit. Made from high-quality materials, they are designed to withstand daily wear and tear while maintaining their stylish appearance. They usually come with a deployment clasp or a folding clasp, ensuring a secure and comfortable fit.
Leather Bands
Leather bands offer a classic look and require a different set of tools and techniques for adjustment. These might have a buckle or a deployment clasp, each providing a unique way of securing the watch. The texture and quality of leather can vary, providing options from sleek and shiny finishes to more rugged, textured surfaces. Over time, leather bands can develop a unique patina, adding character and individuality to the watch.
Rubber Bands
Popular for sports and casual watches, rubber bands are flexible and comfortable but can be trickier to adjust compared to metal or leather bands. They are resistant to water and sweat, making them ideal for active lifestyles. Additionally, rubber bands come in a variety of colors and styles, allowing for easy customization to match personal tastes.
Once you’ve identified your band type, you can proceed with the appropriate adjustment method.
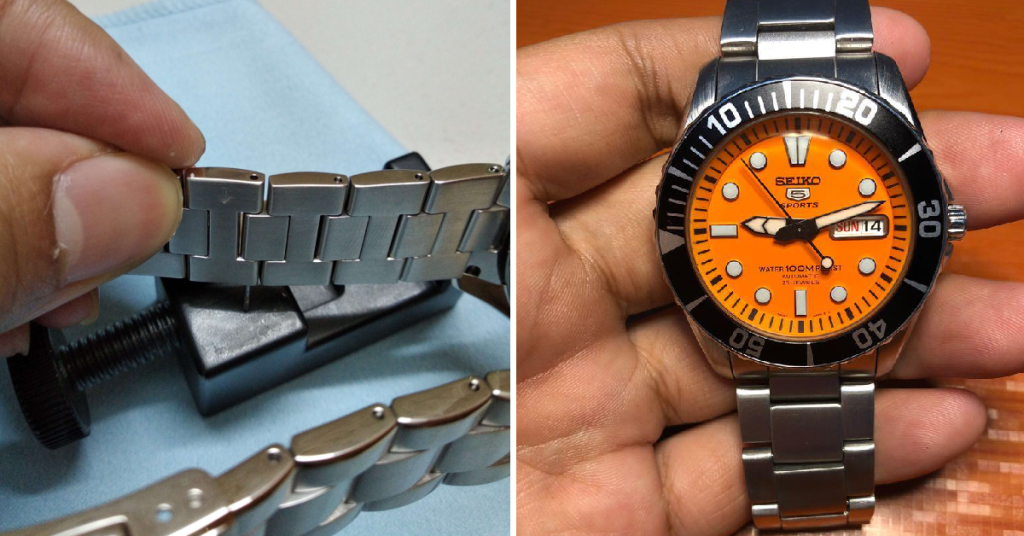
Removing Links from a Metal Watch Band
Metal bands are common among Seiko watches and often require link removal to achieve the perfect fit. Here’s how to go about it.
Step 1: Locate the Pins
Find the small arrows on the inside of the band. These arrows indicate the direction in which the pins should be pushed out.
Step 2: Use the Pin Pusher Tool
Place your watch on the holder to keep it steady. Align the pin pusher tool with the pin and gently tap it with the small hammer until the pin starts to come out. Use tweezers to pull the pin out completely.
Step 3: Remove the Required Links
Repeat the process for the next pin on the other side of the link you wish to remove. Once both pins are out, remove the link. Repeat as needed until you achieve the desired fit.
Step 4: Reassemble the Band
Join the remaining sections of the band and reinsert the pins. Use the hammer to gently tap them back into place.
Adjusting Leather or Rubber Bands
Leather and rubber bands typically offer better flexibility but require a different approach for adjustment.
Step 1: Identify the Adjustment Mechanism
Leather bands usually have multiple holes to accommodate various wrist sizes, while rubber bands might need to be cut to size.
Step 2: Use the Spring Bar Tool
For leather bands, use the spring bar tool to remove the spring bars from the clasp or buckle. Adjust the position of the clasp or buckle to a more suitable hole.
Step 3: Cut the Rubber Band (if needed)
For rubber bands, measure your wrist carefully. Mark the point where you need to cut and use sharp scissors or a knife for a clean cut. Reattach the clasp or buckle using the spring bar tool.
Reassembling the Band and Testing the Fit
After making adjustments, it’s crucial to reassemble the band correctly and test the fit to ensure comfort and security.
Step 1: Reinsert the Pins or Spring Bars
Make sure all pins or spring bars are securely in place. Double-check their positions to prevent any accidental loosening.
Step 2: Test the Fit
Wear the watch and move your wrist around. The band should be snug but not too tight. Ensure there’s a comfortable amount of slack.
Step 3: Fine-Tune if Necessary
If the fit isn’t perfect, make further adjustments. It’s better to make small, incremental changes rather than big ones.
Ensuring a Secure and Comfortable Fit
A well-adjusted watch band not only looks good but also feels comfortable on your wrist. Here are some tips to ensure a secure and comfortable fit.
Check for Movement
Your watch should not slide up and down your wrist. If it does, remove another link or tighten the adjustment.
Ensure Even Distribution
Make sure the watch sits evenly on your wrist. The clasp should be centered under your wrist, not off to one side.
Monitor for Irritation
Wear the adjusted watch for a day and check for any signs of irritation or discomfort. If you experience any, consider making minor adjustments.
Tips and Tricks for Adjusting a Seiko Watch Band
Here are some additional tips to make the adjustment process smoother and more efficient.
Work in a Well-Lit Area: Good lighting will help you see small components clearly, making the process easier and reducing the risk of mistakes.
Keep Spare Parts Handy: Always keep spare pins and links. You never know when you might need them, especially if you lose a tiny component.
Be Patient: Adjusting a watch band can be a delicate task. Take your time and don’t rush. Patience will ensure a better outcome and reduce the risk of damaging your watch.
Use the Right Tools: Ensure you have the necessary tools for the job, such as a spring bar tool or small screwdriver. Using the right equipment can prevent unnecessary damage and make the adjustment smoother.
Test the Fit: After making adjustments, check the fit to ensure comfort and security. Adjust as needed to avoid future discomfort.
FAQs about Adjusting a Seiko Watch Band
Can I adjust my Seiko watch band myself?
Yes, with the right tools and techniques, you can easily adjust your Seiko watch band at home.
Do I need any special tools to adjust my Seiko watch band?
While specialized tools such as a spring bar tool or pin pusher can make the process easier, you can also use household items like a small screwdriver or tweezers in a pinch.
How tight should my watch band be?
The watch band should fit comfortably on your wrist without being too loose or digging into your skin. Aim for a snug but not tight fit.
How often should I adjust my watch band?
It’s a good idea to check the fit of your watch band every few months, as factors like weight fluctuations and temperature can affect the fit. Adjust as needed for optimum comfort.
Conclusion
Adjusting a Seiko watch band may seem intimidating, but with the right tools and guidance, it’s a manageable task that anyone can do. This skill not only empowers you to customize your watch for the perfect fit but also saves you time and money. Remember, practice makes perfect. The more you do it, the better you’ll get.
For more personalized advice, feel free to book a consultation with our expert team. Happy adjusting!